Sunday, December 29, 2013

Craftiness Double Whammy!: Pickle Listening Phones and Chalkboard Rekenreks

My winter break is half over *sigh* and I was finally able to do a few crafty, productive projects for my classroom for when we return in a week :'( So today I'm linking up with Preserving Life's Awesome Things blog hop:

http://jessicabooth.blogspot.com/2014/01/awesome-things-tuesday.html
 
 
I have been meaning to make both of these items for a while but, being both OCD and ADD (or so I think I am), I had to think for quite a while about how I wanted to do both of them and came up with the following results.
 
 
Voila! My Pickle Listening Phone and Chalkboard Rekenrek!! I'm so super excited about how these turned out that it almost makes me excited for winter break to be over so I can use them with my kiddos. Almost...
 
Anyhoo, Pickle Phones first...

 
These were so insanely easy that I was tempted to just post the pictures and leave it at that as they kind of speak for themselves but then I thought "Why deprive you all of my witty and clever commentary?!?" ;)
 
So, all you need is 4" lengths of 3/4" PVC pipe, 90 degree PVC elbows, and some duct tape. I was so excited when I found this adorable pickle tape. It's actually what got me motivated to make the phones to begin with! Plus, it helps that the guy at Home Depot cut the pipe into 4" pieces for me.
 
*Note: I chose to get my supplies from Home Depot because they actually had a professional plumber's pack of the elbow joints. It had 25 pieces in a bag so, to make 25 phones, I just had to get 2 $5 bags of elbow joints and one 10 foot length of pipe totaling a whole $15 in cost!

 
Alright, first thing's first. Shove an elbow piece onto each end of the pipe piece. It takes quite a bit of elbow grease and I won't lie, my arms hurt a bit after assembling 25!

 
Check to make sure the two elbow pieces are even (I just eyeballed it).

 
Ta da! It's a phone! But kind of a boring looking one.

 
Plus the majority of my pieces had print on them. The solution? Super cute duct tape!

 
Simply put one end on, wrap, snip, and smooth! And yes, the pickle is saying "Dill with it!" hehe

 
And done!! Easy peasy!

 
You gotta love the look of a completely finished project! Especially when it only takes an hour or so for a set of 25. And they only ended up costing about 80 cents a piece!!!
 
 
Now on to the rekenreks. These are MUCH more time consuming than the snap-together phones.

 
I used all the items in the picture above: hobby wood from Home Depot, a miter box saw, power drill with 1/8" drill bit, sandpaper block, rekenrek template (link below), green paint, chalkboard paint, paintbrushes, pipecleaners, and red and white pony beads (not pictured).

 
I thought I would give you a shot of the tag on the wood since I was able to get 4 perfectly sized rekenreks out of one board. The one board measures 1/4" thick and 2/5" by 2 feet long.

 
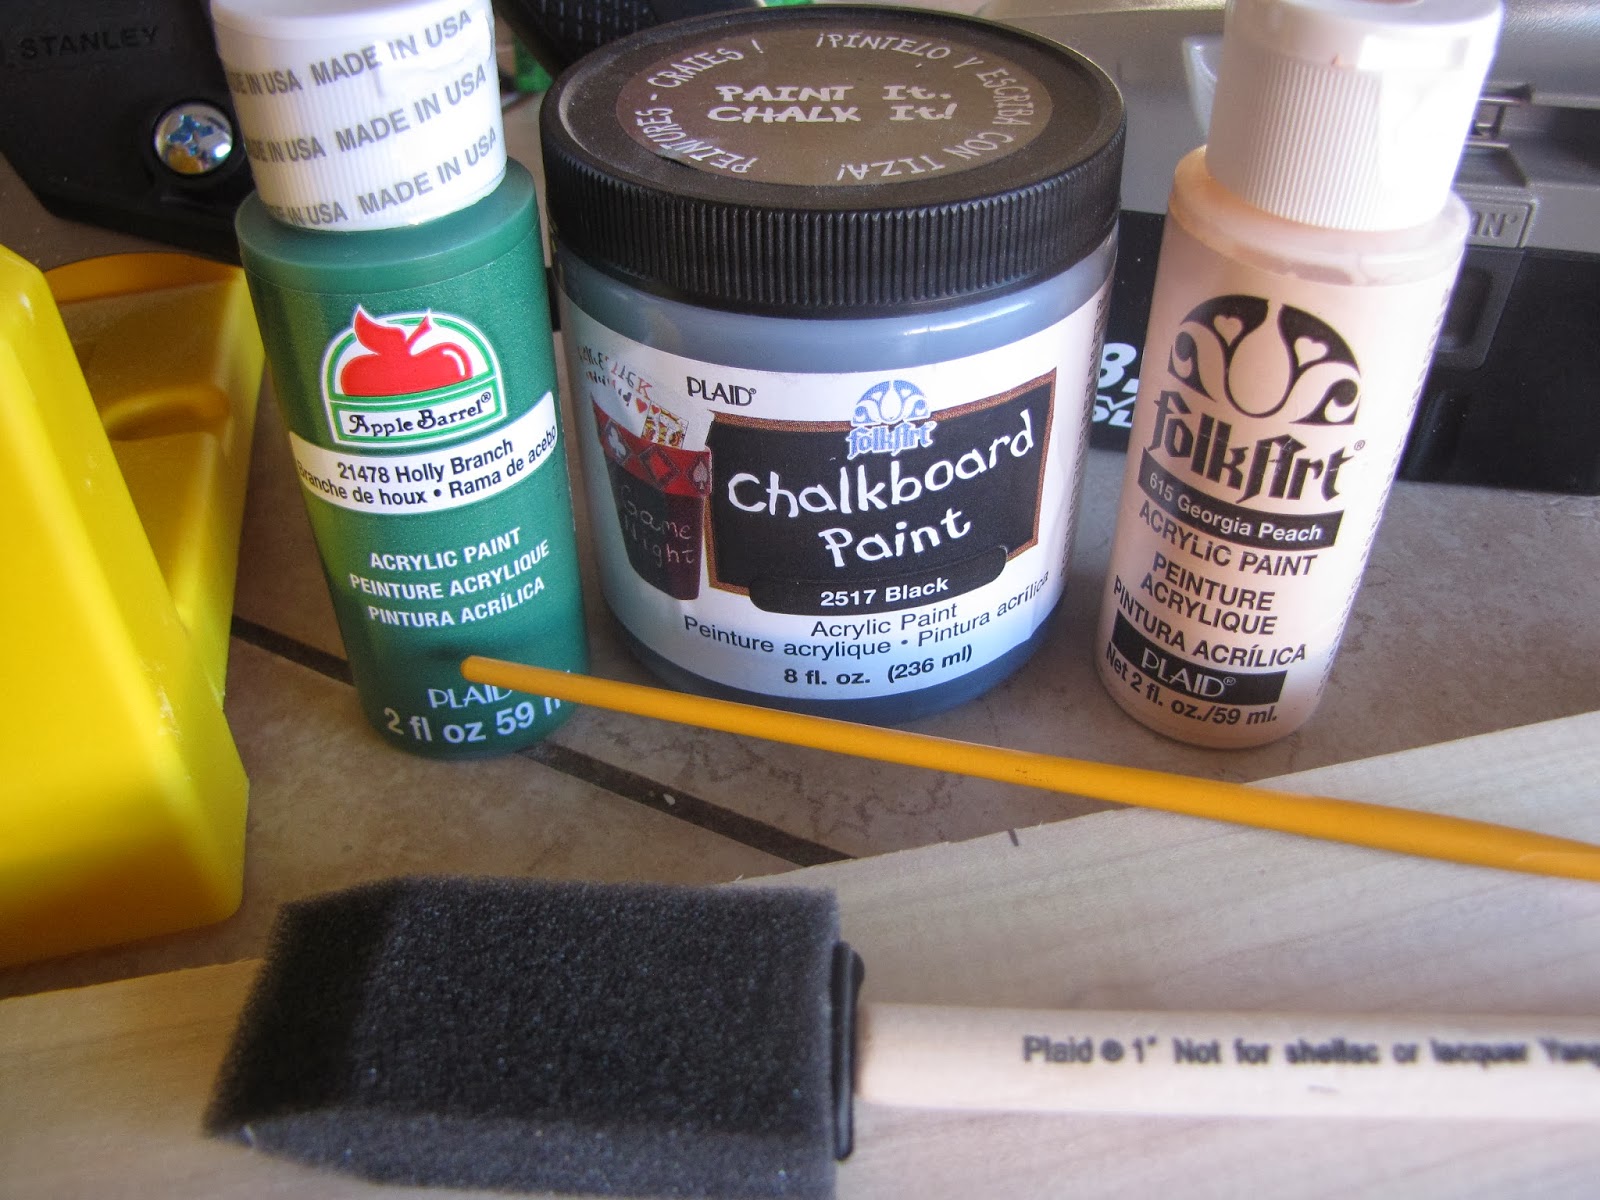
Also, the paint is all available at local craft stores. I've even seen it at Walmart!

 
The miter box is probably not a necessity as I'm sure the wonderful guys at Home Depot probably would have cut this for me too but I wasn't sure of how big I wanted them until I got home and did some more thinking.

 
I ended up cutting the board into fourths making each rekenrek 2.5"x6".

 
Set it in the miter box and saw away.

 
Once you're done, you'll probably have a rough edge on the end.

 
Just attack it with the sandpaper block and it will take care of that in no time.

 
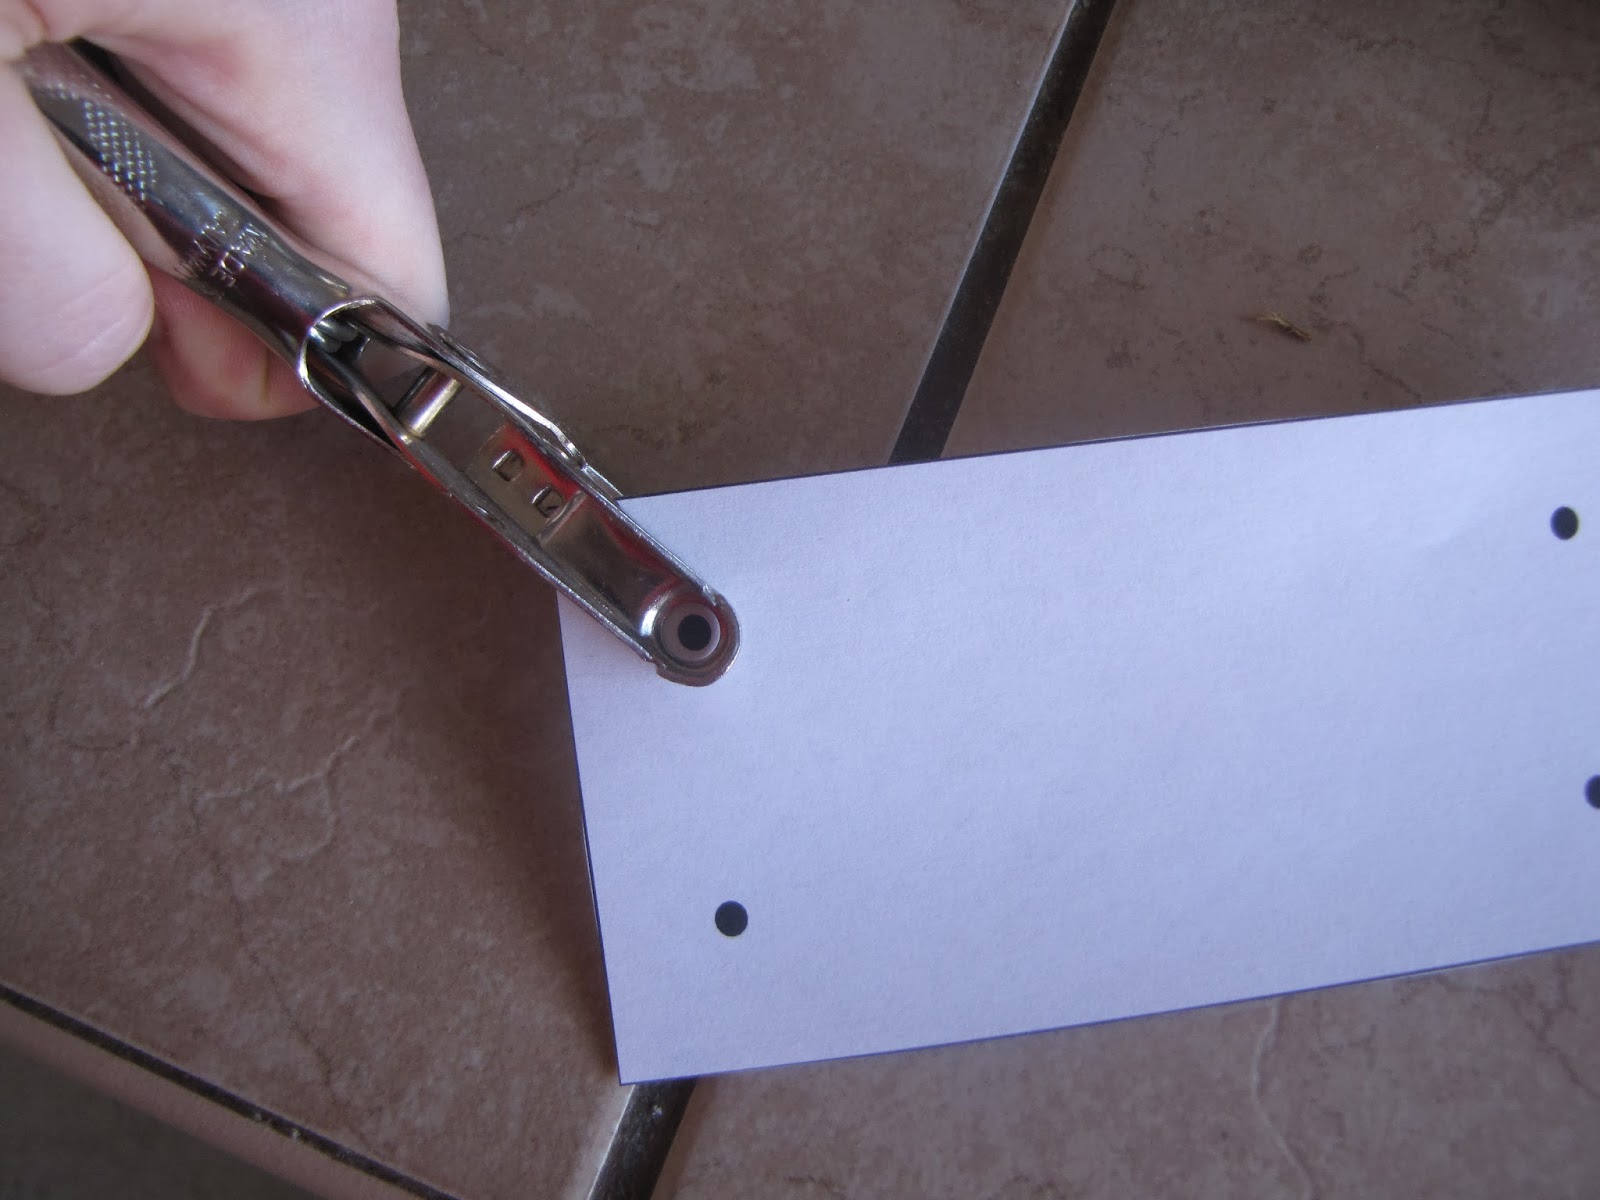
Next, cut out your template (or you can just wing it but my OCD brain would never go for that). I just used a hole punch for the big holes. If you would like my template, you can find it here. I included two versions, one with a space for an answer box like the one I made and one with just the 4 holes.

 
Put the template on the wood and mark the holes with a marker.

 
Then use your drill to make the 4 holes.

 
Grab that trusty sanding block and clean up the holes on the front and back sides.

 
Then you get to paint! I started with the sides and back then the front.

 
Once dry, I chopped the answer box portion off the template and cut out the middle to use as a stencil. (I was going to use a teeny tiny paper punch I have but left it at work and I'll be darned if I'm going to work for a paper punch!)

 
Once you're done with all the painting, you're ready for the beads. Simply add 5 of one color and 5 of another (I chose the traditional red and white) to your pipecleaner.

 
Thread the ends of the pipecleaner through your drilled holes as evenly as possible.

 
Twist and wrap the ends together.
 
 
And you're done!

 
And my kiddos will love that they can write an answer in the space on the right and still be able to erase and change as necessary!
 
Enjoy!
Katie


Thursday, December 26, 2013

Another great giveaway!

Tammy Ferrell over at Dots of Fun Clipart and 1, 2, 3, Teach With Me has hit her 1,000 follower milestone and, of course, to celebrate, is having a giveaway over at her ____ blog. To check it out, click the picture below:
 
http://www.123teachwithme.com/

 
Plus, if you've been eyeing my Rhyming Bundle, you'll find that included in the pack!
 
 
http://www.teacherspayteachers.com/Product/Rhyming-Unit-Mega-Bundle-17-Rhyming-Activities-931014
 
 
So, take a second and head over to her blog to enter to win!
 
Katie

Friday, December 20, 2013

Christmas Craftiness

We had such a CRAZY busy week this week but, as usual, it was so much fun! We used every spare moment to work on making gift bags with goodies for the kiddos to take home to their parents.
 
The first thing we made were cinnamon applesauce ornaments. These are my absolute favorite ornaments because they are ridiculously easy and cheap to make, especially when I have wonderfully generous classroom parents that ask to bring in supplies. All we needed for these was a bit of applesauce and an equal amount of cinnamon. Simply mix them together and they turn into a dough that you can use as playdough in a center or, like we did, roll them out and cut with a cookie cutter to make an ornament. Two tips though: 1) Use a straw to make a hole in the top while it's still wet so it will be easier to make into an ornament later and 2) make these at least a few days before you need to have them done. They do take a while to dry and I would HIGHLY recommend flipping them every day or so.
 
 
When we made these, we were doing them with a class of 16 kiddos so we did them as one of our centers on Monday, put the ornaments on cookie sheets to dry and labeled them by putting their names on masking tape on the cookie sheet. They were dry by Thursday so we could tie ribbon on them!


The second project we did was a snowflake frame. We started by making a VERY simple backdrop so we could take a picture of each of the kiddos for in their frame. We have a very culturally diverse class so we strive to make things winter based, just in case.

 
The first part of the project was done on Monday afternoon since, of course, it needed to dry before we could do the second part. All the kiddos did was to paint popsicle sticks (4 per child) and puzzle pieces (about 8 per child) with white paint. Unfortunately, we were out of regular wood colored sticks, so we improvised and used these colored ones instead.

 
For part two, I simply printed out their pictures in 3 1/2" by 5" size, trimmed them so they were 3 1/2" square, and glued them in the center of a 4 1/2" square paper. This gave them a nice 1/2" border around their picture to glue the popsicle sticks onto. Then, once the sticks were one, they glued as many puzzle pieces on as they wanted and they were done! (I actually kind of loved them with the colored sticks!)

 
Our third project was also a multi-parter and I think it was the kids' favorite. We started out by making some microwave snow playdough. Super easy! I just used the recipe below:
 
 
The big difference with our dough was that I put glitter in it instead of food coloring so it had a sparkly white look. Plus, instead of heating it for one long time period, I found it turned out MUCH better to do 30 seconds at a time so it could be stirred and it wouldn't get over-cooked. Plus, the kids loved to see it after each 30 seconds to check on its progress. Once it felt doughy, it was done!


As I was doing the dough with half the class, my aide was making these adorable snowmen jars out of baby food jars with the other half. It's seriously just black and orange construction paper with Elmer's school glue. Just use a regular ol' one hole paper punch for the eyes and mouth and free-hand cut some little triangles. I told the kiddos that the black circles were for the eyes and mouth and the triangle was the nose. Where they put them was totally up to them.

 
Once the dough was cooled, we put it in the jars and they were ready to go!

 
Finally, each kiddo got a brown paper bag to decorate with some of our random crafty supplies. We just put out sparkly confetti, glitter glue (which we like to put on plates with Q-tips so they can "paint" it on), markers, and crayons.

 
We then wrapped the applesauce ornaments in tissue paper and put everything in the bags so they were ready to go! Nothing like super cute (and cheap!) gifts!!
 
Katie


Tuesday, December 17, 2013

You won't find Santa at our house!

When I was a little girl, I remember laying in bed trying to hear reindeer on the roof, going to sit on Santa's lap each year to tell him what I wanted, and the excitement I felt each year on Christmas morning when I would run downstairs to see what he had left me. However, I also remember being told to be good or I would get coal in my stocking, singing songs like "You better not pout, You better not cry, You better not shout, I'm telling you why...", and writing a letter to Santa in school each year telling him everything I was hoping to find under the tree on Christmas morning only to find something completely different under the tree.

I was always a bit puzzled when I didn't get exactly what I wanted and tried my hardest to be extra good the next year and to be super detailed in my letter only to be disappointed year after year.

Now I know what you're thinking... getting what you want for Christmas is not what Christmas is about. As an adult, I completely understand that. However, as a child, when all you hear is "Be good so you get gifts", it's kind of difficult to think of anything else.

Sure, we went to Catholic Mass with my mom's family (is an 8-year old really going to pay attention?). And yes, we knew that Christmas was supposed to celebrate Jesus's birth. But, how does the idea of a man in a red suit watching you to make sure you're being good an accurate celebration of the nativity?


Don't get me wrong, I am NOT anti-Santa. I love the traditional idea behind Santa... the spirit of giving and generosity. However, it seems like it's been distorted into something that is more about getting children to behave at this crazy time of year rather than the joy of giving a gift to someone that may not otherwise get one. It's more bribery and threats than magic and making wishes come true.

Then there's a certain elf that's supposed to be watching to make sure your child is behaving when they themselves are causing all kinds of mischief... (but we won't get into that)


Now, I'm not saying that our Christmas traditions are perfect or even novel by any means. We go to church Christmas Eve. We have stocking by our fireplace and gifts under the tree. However, we have family traditions that have been in our family for generations and that have meaning behind them other than getting our children to behave. For example, one of my favorite traditions is our hide-the-pickle-ornament tradition. I have a beautiful hand-blown glass pickle ornament that I got from my parents and, on Christmas Eve, after our girls have gone to bed, we hid the ornament on the tree and, the first to find it, gets to open the first gift. It's a very old German tradition and, being half-German, it is one of my favorites.


Also, perhaps the best tradition we have in our house is to make a baby Jesus birthday cake on Christmas Eve. It's not a tradition that has been handed down for many generations but, because we had decided to not do Santa, we wanted something that, in our Christian household, would support the true meaning of Christmas. There are lots of ideas online for a Jesus birthday cake but we decided to combine a few that had great symbolism behind them.

We start out with a chocolate cake (representing our sin) and frost it with white frosting (representing how Jesus covered our sin by dying on the cross). Then, we have little angel figurines that we add for the angel that spoke to Joseph and for the angel that declared his birth. We also add a star to the cake for the star that guided the wise men. Then we put a few evergreen trees to symbolize his everlasting love. And finally, we add candles and light them because he is the light of our world.


Now, the cake has taken on various forms over the years because the girls like to get creative with their ideas. One year we did chocolate cupcakes with vanilla frosting and frosted them as if they were a sheet cake and added our toppings. Another year we did a very traditional round two layer cake. Yet another year, we decided to use our cookie cutters to make angel, tree, and star cookies to frost and add to the tree. No matter what we do, we make sure the message is still there and we make sure the point of the activity is to remember that it is Jesus's birthday and not just an excuse to eat cake (although that is a bonus!).


Don't think that it has been easy by any means to skip Santa. Last year Noella begged to do Santa. And trust me, it was VERY tempting to give in because it can be very fun. However, we had our reasons for not doing it up until that point so we stuck to our guns. So, we asked her if she would believe a gift was from Santa if she found one from him under the tree. When she said "no" we explained that the point of Santa is the belief in the spirit of Christmas. Then we told her that, if she were to believe in something, we would rather her believe in God and Jesus who can gift you with everlasting life rather than Santa who would bring you toys. Then, once we reminded her that she wouldn't get any additional gifts if we did Santa, that we would only take a gift from us and label it "from Santa", she got the point.

Then the kicker came... We asked her to remember her last birthday and how she felt when everyone came over to celebrate with her. She said she loved it. Then we asked how she would feel if some of her friends forgot her birthday and decided to go to someone else's house just because they were going to give them a toy. She said she would be crushed. Then she got that "lightbulb" look in her eyes and she hasn't asked to do Santa again.


So yes, we do gifts, we do stockings, we do Christmas lights, but we also do Jesus, birthday cake, and faith! There may not be Santa here but we're OK with that!


Tuesday, December 10, 2013

Everyone loves a giveaway!

Everyone loves a giveaway, right? Well, be sure to check out Tina's Teaching Treasures to enter her 1,000 TpT follower giveaway. Products from 25 TpT sellers plus a $25 TpT gift certificate!! Can't beat that!

http://www.tinasteachingtreasures.com/tinas-blog/1000-follower-giveaway/

Saturday, December 7, 2013

Winter Product Swap

I am SO excited to be participating in a Winter Product Swap over at ...and they all fall down...!
 
I get the honor of swapping with Blair Turner over at One Lesson At A Time.

http://one-lesson-at-a-time.blogspot.com/
 
 
Although I work with Pre-K kiddos, Blair's Holiday Grammar Pack was still a very useful pack as my older daughter is in second grade and working on grammar as we speak! Nothing like perfect timing... and a perfect pack!!
 
http://www.teacherspayteachers.com/Product/Winter-Holidays-Grammar-Packet-974128
 
My daughter loved the variety of activities in this pack!! It includes pages for various kinds of grammar including parts of speech, present to past tense verbs, etc. and the content of each page covers a different winter holiday like Diwali, Hanukkah, and lots of others! So not only did she work on her grammar... She also learned about winter holidays celebrated by various cultures! The best part? A key is included for each page!


She said her favorite pages were "Trim the Christmas Tree" (a color-by-parts of speech activity) and "Chinese New Year Noun Search" (circle the singular nouns with red and the plural nouns with yellow). Anything where she can use markers or crayons is right up her alley!!
 
Blair also offers a variety of freebies on her page including her "Holiday Coupon Book" which my class is going to do in a couple weeks as part of their holiday gift to their parents!!! Not only is it ADORABLE, but it also has a blackline version which my crayon-inclined kiddos are going to love!


Be sure to check our Blair's store for more great goodies...
 
http://www.teacherspayteachers.com/Store/Blair-Turner
 
and the rest of the product swaps over at ...and they all fall down...:
 
http://t11w.blogspot.com/
 
Have a wonderful holiday season!
Katie